
실습 목표
- 인스턴스 두개에 하나는 nginx , 하나는 httpd를 설치한다. 각 인스턴스는 pub1,pub2 서브넷에 둔다
- 두 인스턴스를 타겟그룹으로 하는 로드밸런서를 생성한다
- 로드밸런싱이 되는것은 확인한다.
nginx, httpd를 실행시키기 위한 인스턴스 생성
둘 다 soo-vpc를 쓰고
로드밸런싱 테스트를 위해 nginx는 soo-subnet01, httpd는 soo-subnet03 를 사용하도록 했다.

nginx 띄울 인스턴스
[ec2-user@ip-10-123-1-195 ~]$ sudo amazon-linux-extras install nginx1
Installing nginx
Loaded plugins: extras_suggestions, langpacks, priorities, update-
              : motd
Cleaning repos: amzn2-core amzn2extra-docker amzn2extra-kernel-5.10
              : amzn2extra-nginx1
17 metadata files removed
6 sqlite files removed
0 metadata files removed
Loaded plugins: extras_suggestions, langpacks, priorities, update-
              : motd
amzn2-core                                  | 3.7 kB     00:00
amzn2extra-docker                           | 3.0 kB     00:00
amzn2extra-kernel-5.10                      | 3.0 kB     00:00
amzn2extra-nginx1                           | 3.0 kB     00:00
(1/9): amzn2-core/2/x86_64/group_gz           | 2.5 kB   00:00
(2/9): amzn2extra-docker/2/x86_64/updateinfo  | 8.0 kB   00:00
...nginx 띄울 인스턴스에 nginx 설치
[ec2-user@ip-10-123-1-195 ~]$ curl localhost:80
<!DOCTYPE html>
<html>
<head>
<title>Welcome to nginx!</title>
<style>
html { color-scheme: light dark; }
body { width: 35em; margin: 0 auto;
font-family: Tahoma, Verdana, Arial, sans-serif; }
</style>
</head>
<body>
<h1>Welcome to nginx!</h1>
<p>If you see this page, the nginx web server is successfully installed and
working. Further configuration is required.</p>

<p>For online documentation and support please refer to
<a href="<http://nginx.org/>">nginx.org</a>.<br/>
Commercial support is available at
<a href="<http://nginx.com/>">nginx.com</a>.</p>

<p><em>Thank you for using nginx.</em></p>
</body>
</html>재부팅 후, 접속 확인
httpd 띄울 인스턴스
[ec2-user@ip-10-123-1-195 ~]$ sudo systemctl restart nginx
[ec2-user@ip-10-123-3-106 ~]$ sudo yum install -y httpd
Loaded plugins: extras_suggestions, langpacks, priorities, update-
              : motd
Resolving Dependencies
--> Running transaction check
---> Package httpd.x86_64 0:2.4.54-1.amzn2 will be installed
--> Processing Dependency: httpd-tools = 2.4.54-1.amzn2 for package: httpd-2.4.54-1.amzn2.x86_64
--> Processing Dependency: httpd-filesystem = 2.4.54-1.amzn2 for package: httpd-2.4.54-1.amzn2.x86_64
--> Processing Dependency: system-logos-httpd for package: httpd-2.4.54-1.amzn2.x86_64
--> Processing Dependency: mod_http2 for package: httpd-2.4.54-1.amzn2.x86_64
--> Processing Dependency: httpd-filesystem for package: httpd-2.4.54-1.amzn2.x86_64
--> Processing Dependency: /etc/mime.types for package: httpd-2.4.54-1.amzn2.x86_64
--> Processing Dependency: libaprutil-1.so.0()(64bit) for package: httpd-2.4.54-1.amzn2.x86_64
--> Processing Dependency: libapr-1.so.0()(64bit) for package: httpd-2.4.54-1.amzn2.x86_64httpd 인스턴스에도 설치하고
[ec2-user@ip-10-123-3-106 ~]$ sudo systemctl restart httpd
[ec2-user@ip-10-123-3-106 ~]$ curl localhost
<!DOCTYPE html PUBLIC "-//W3C//DTD XHTML 1.1//EN" "<http://www.w3.org/TR/xhtml11/DTD/xhtml11.dtd>">

<html xmlns="<http://www.w3.org/1999/xhtml>" xml:lang="en">
    <head>
        (생략)
    </head>

    <body>
        <h1>Test Page</h1>

        <div class="content">
            <div class="content-middle">
                <p>This page is used to test the proper operation of the Apache HTTP server after it has been installed. If you can read this page, it means that the Apache HTTP server installed at this site is working properly.</p>
            </div>
            <hr />

            <div class="content-columns">
                <div class="content-column-left">
                    <h2>If you are a member of the general public:</h2>

                    <p>The fact that you are seeing this page indicates that the website you just visited is either experiencing problems, or is undergoing routine maintenance.</p>

                    <p>If you would like to let the administrators of this website know that you've seen this page instead of the page you expected, you should send them e-mail. In general, mail sent to the name "webmaster" and directed to the website's domain should reach the appropriate person.</p>

                    <p>For example, if you experienced problems while visiting www.example.com, you should send e-mail to "webmaster@example.com".</p>

                    <hr />
                </div>

                <div class="content-column-right">
                    <h2>If you are the website administrator:</h2>

                    <p>You may now add content to the directory <tt>/var/www/html/</tt>. Note that until you do so, people visiting your website will see this page, and not your content. To prevent this page from ever being used, follow the instructions in the file <tt>/etc/httpd/conf.d/welcome.conf</tt>.</p>

                                        <p>You are free to use the image below on web sites powered by the Apache HTTP Server:</p>

                                        <p align="center"><a href="<http://httpd.apache.org/>"><img src="/icons/apache_pb2.gif" alt="[ Powered by Apache ]"/></a></p>

                </div>
            </div>
        </div>
    </body>
</html>접속 확인
로드밸런서 생성
이제 두 subnet에 대한 로드밸런서를 설정해줘야한다.

- load balancer types 에 대한 게시글 추가로 작성할 예정
soo-lb 라는 이름의 로드밸런서를 추가한다.

그리고 각 nginx와 Httpd가 있는 soo-subnet01, soo-subnet03에 대한 로드밸런서 설정
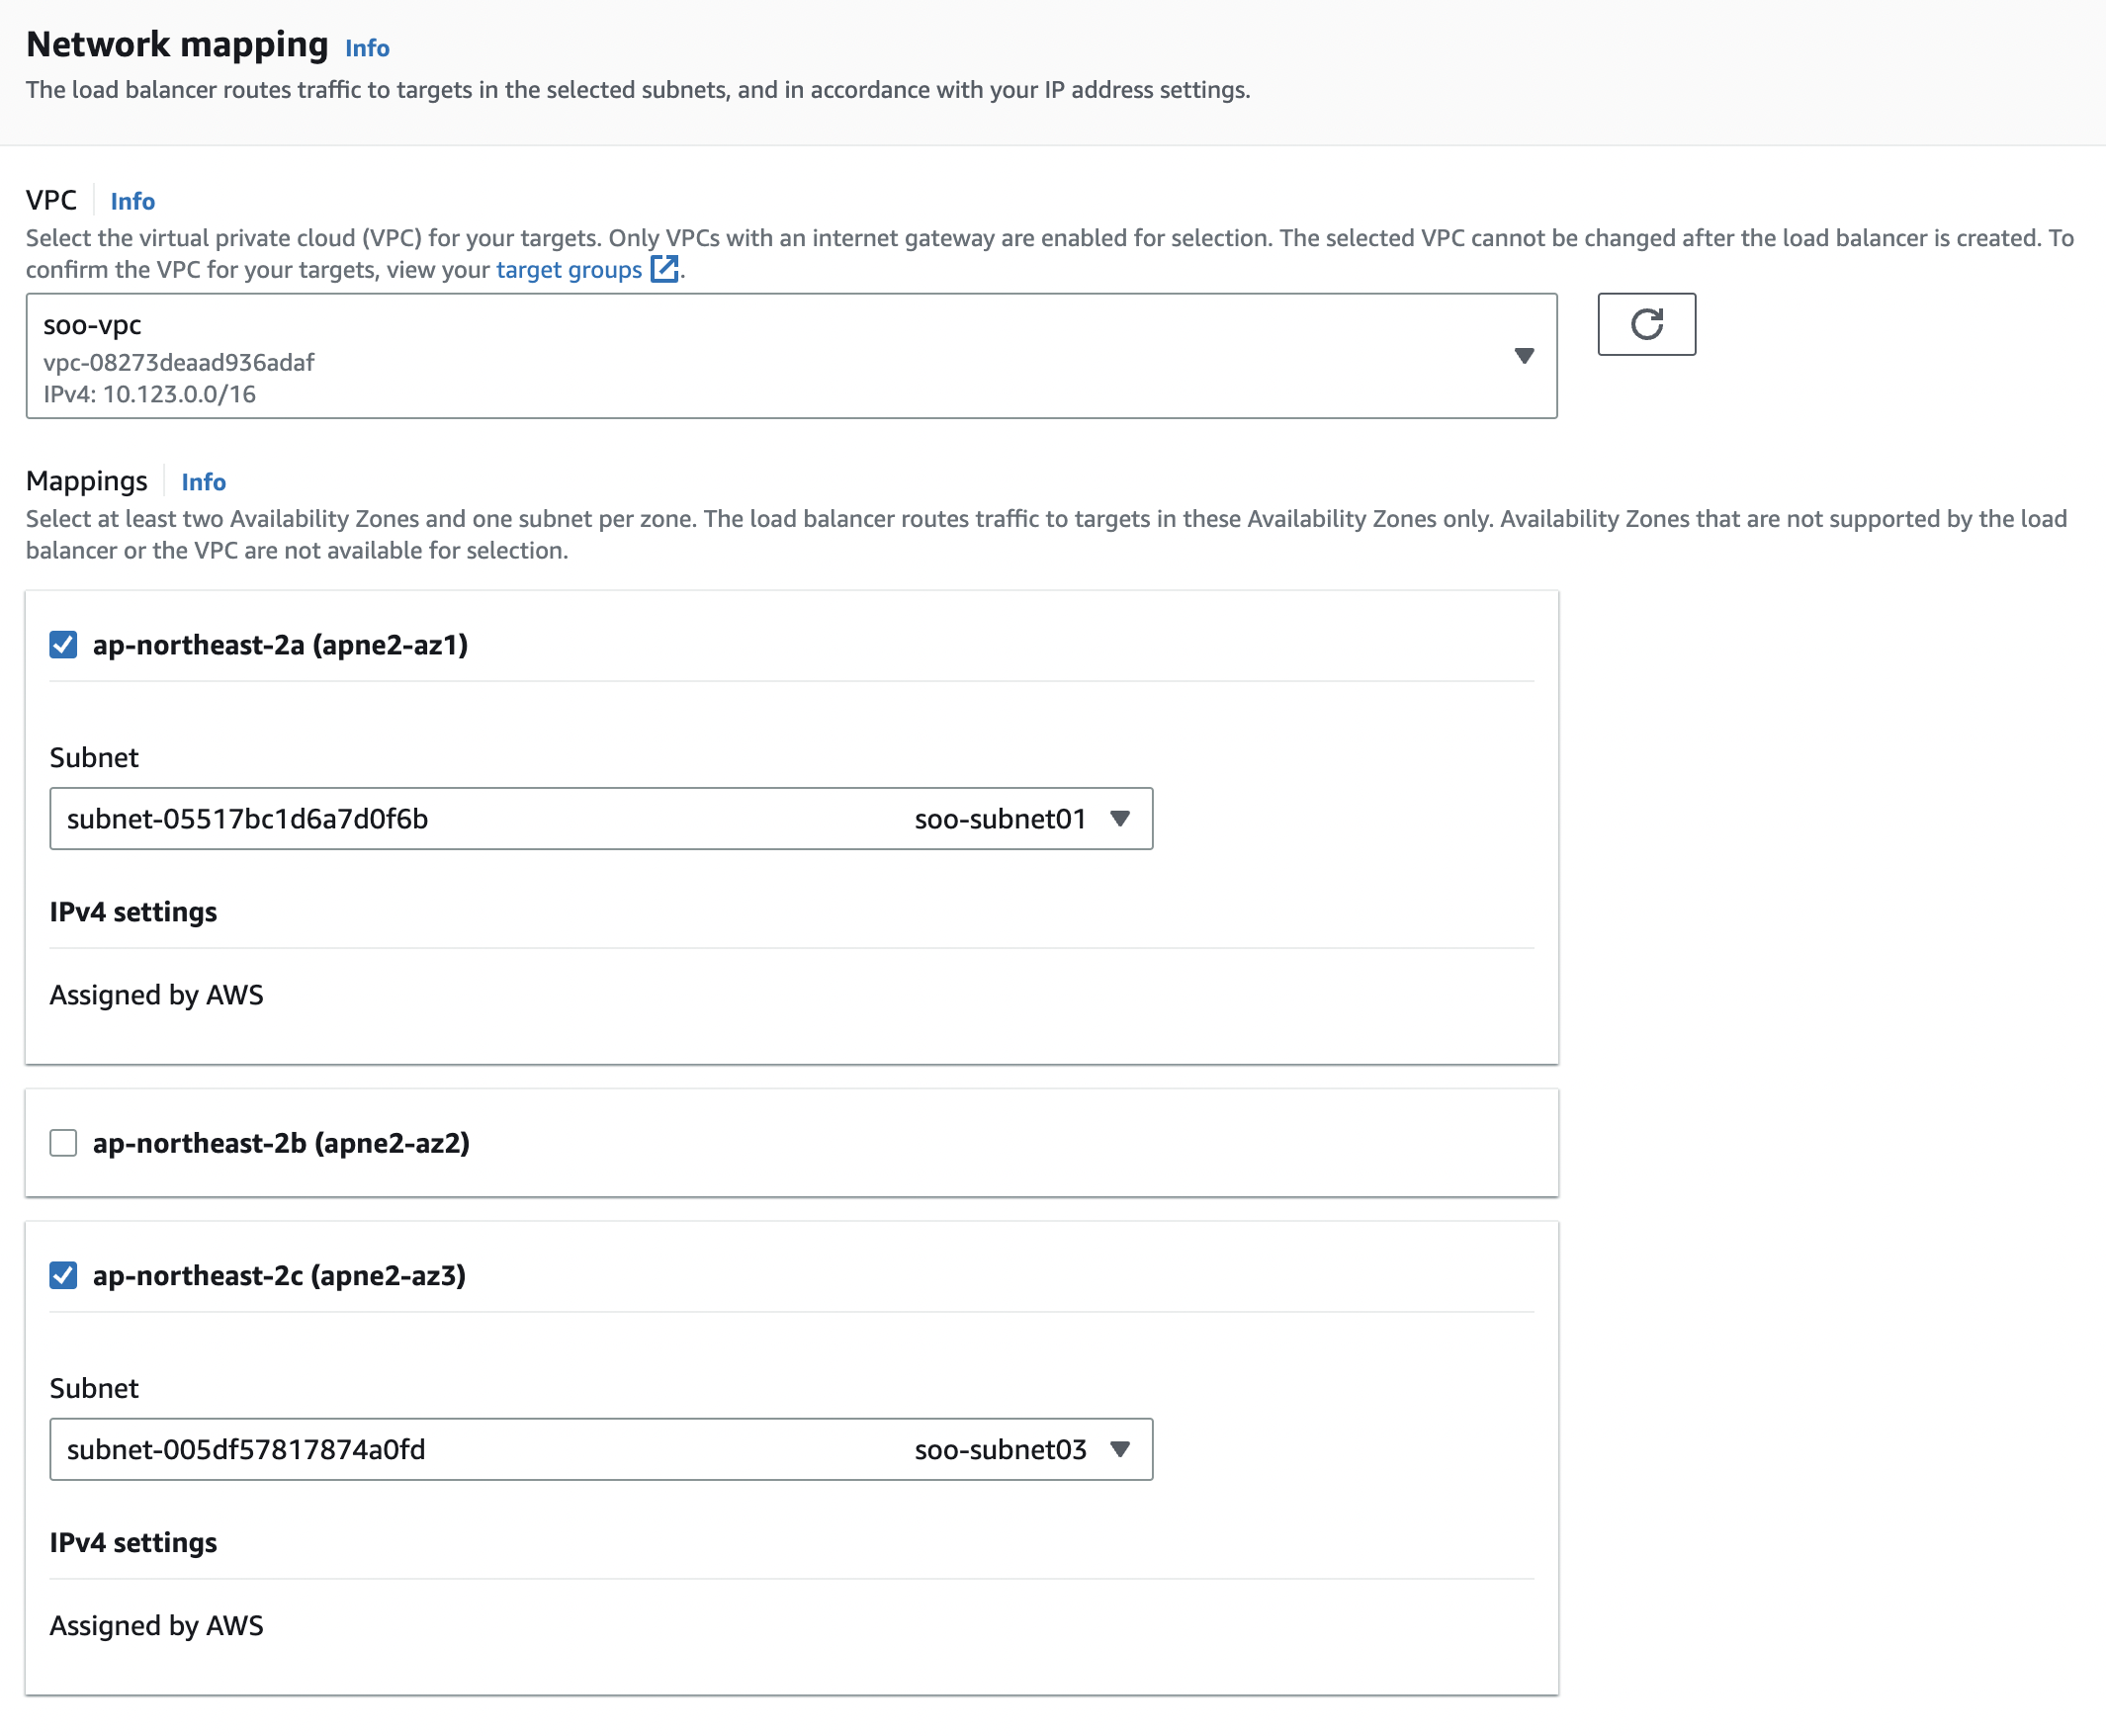
보안 그룹은 지정한 vpc와 같게 설정해준다.

그 다음, 서브넷 안에서 바라보고있을 포트를 지정해야한다.
바라보고 있을 대상에 대한 그룹, target group 을 지정해준다.

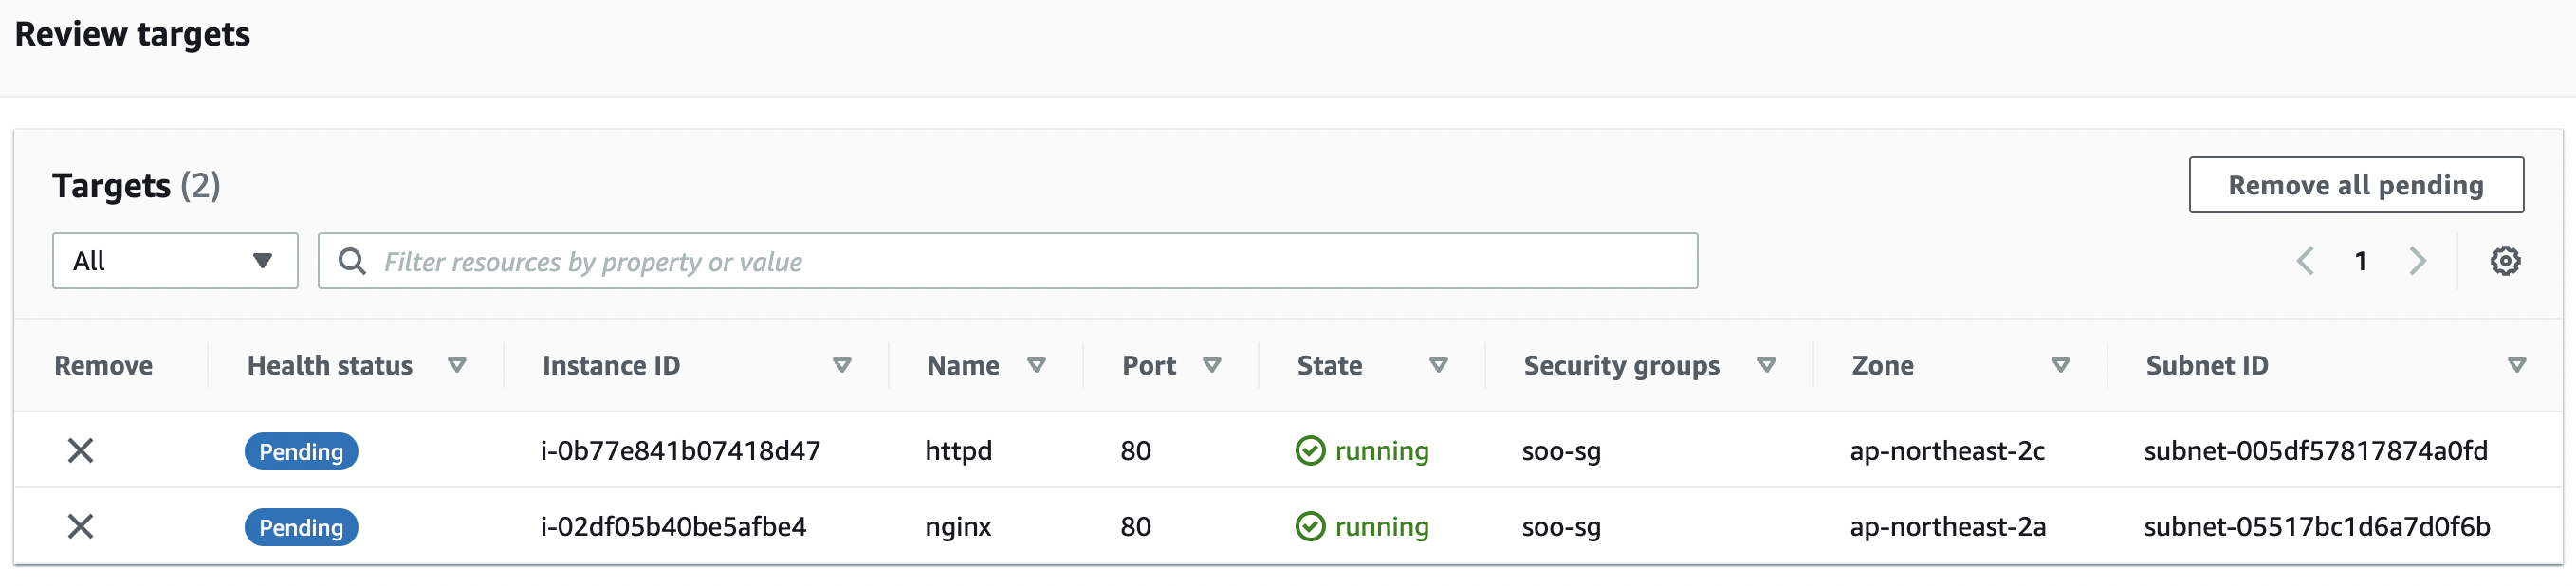
target group 생성
미리 만들어준 target group이 없으므로 create target group 를 선택해 새 탭에서 만들어 오자.
앞서 생성한 인스턴스(nginx, httpd)로 지정해줄 것이다.

nginx, httpd 모두 80번 기본포트를 사용하므로 80으로 지정

지속적으로 health check 할 경로 지정

둘 모두 타겟으로 지정해주고 타겟 그룹 생성
다시 로드밸런서 설정

방금 만들어온 soo-lb-tg 이름의 target group을 지정해준다.
health check
그런데 httpd가 Health checks failed with these codes: [403] 로그와 함께 unhealthy 상태!
이는 index.html을 못찾아서 라고 한다.
밑 블로그 참고해 바라보고있는 경로에 index.html을 직접 설정해주면 된다.
[ec2-user@ip-10-123-3-106 ~]$ sudo cp /usr/share/httpd/noindex/index.html /var/www/html/index.html
출처: https://dev.classmethod.jp/articles/mistakes-that-you-make-often-when-you-create-alb/
index.html을 지정해주면

healthy 상태로 바뀐 것 확인
접속
접속은 앞서 만든 load balancer 상세 창에 나와있는 DNS로 하면 된다.
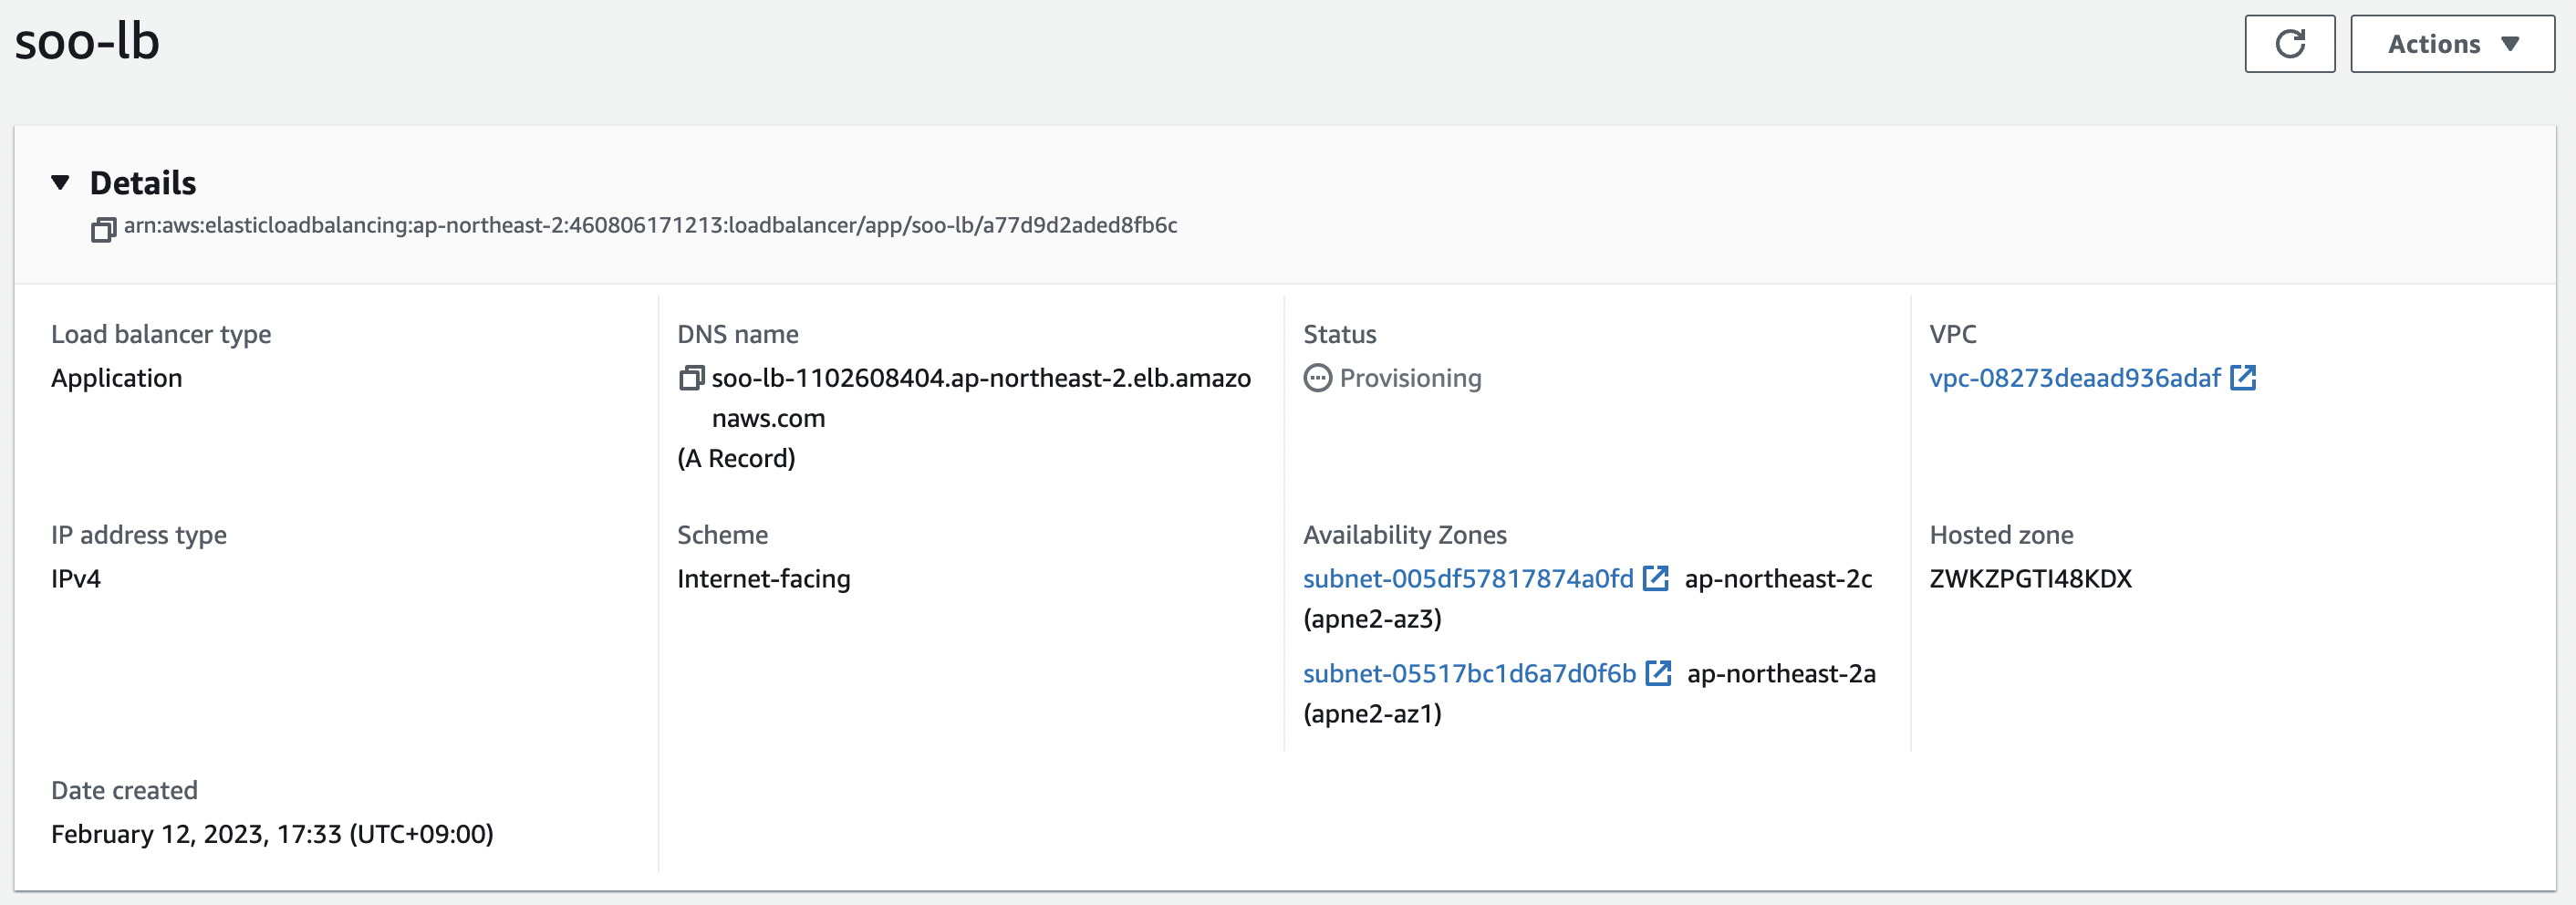


같은 주소에서 httpd, nginx 가 번갈아가며 응답하는 것을 확인할 수 있다.
security group 설정
아웃바운드 규칙은 따로 지정해주지 않았고
httpd, nginx 의 80번 기본 포트, 두 인스턴스에 ssh 접속 할 수 있도록 22번 포트, 그리고 모든 IP에 대해 접속할 수 있도록 설정해주었다.

- 8080과 8085는 따로 tomcat이랑 spring boot 프로젝트 띄우기 위해 설정해둔 것
실습 목표
- 인스턴스 두개에 하나는 nginx , 하나는 httpd를 설치한다. 각 인스턴스는 pub1,pub2 서브넷에 둔다
- 두 인스턴스를 타겟그룹으로 하는 로드밸런서를 생성한다
- 로드밸런싱이 되는것은 확인한다.
nginx, httpd를 실행시키기 위한 인스턴스 생성
둘 다 soo-vpc를 쓰고
로드밸런싱 테스트를 위해 nginx는 soo-subnet01, httpd는 soo-subnet03 를 사용하도록 했다.
nginx 띄울 인스턴스
[ec2-user@ip-10-123-1-195 ~]$ sudo amazon-linux-extras install nginx1
Installing nginx
Loaded plugins: extras_suggestions, langpacks, priorities, update-
              : motd
Cleaning repos: amzn2-core amzn2extra-docker amzn2extra-kernel-5.10
              : amzn2extra-nginx1
17 metadata files removed
6 sqlite files removed
0 metadata files removed
Loaded plugins: extras_suggestions, langpacks, priorities, update-
              : motd
amzn2-core                                  | 3.7 kB     00:00
amzn2extra-docker                           | 3.0 kB     00:00
amzn2extra-kernel-5.10                      | 3.0 kB     00:00
amzn2extra-nginx1                           | 3.0 kB     00:00
(1/9): amzn2-core/2/x86_64/group_gz           | 2.5 kB   00:00
(2/9): amzn2extra-docker/2/x86_64/updateinfo  | 8.0 kB   00:00
...
nginx 띄울 인스턴스에 nginx 설치
[ec2-user@ip-10-123-1-195 ~]$ curl localhost:80
<!DOCTYPE html>
<html>
<head>
<title>Welcome to nginx!</title>
<style>
html { color-scheme: light dark; }
body { width: 35em; margin: 0 auto;
font-family: Tahoma, Verdana, Arial, sans-serif; }
</style>
</head>
<body>
<h1>Welcome to nginx!</h1>
<p>If you see this page, the nginx web server is successfully installed and
working. Further configuration is required.</p>

<p>For online documentation and support please refer to
<a href="<http://nginx.org/>">nginx.org</a>.<br/>
Commercial support is available at
<a href="<http://nginx.com/>">nginx.com</a>.</p>

<p><em>Thank you for using nginx.</em></p>
</body>
</html>
재부팅 후, 접속 확인
httpd 띄울 인스턴스
[ec2-user@ip-10-123-1-195 ~]$ sudo systemctl restart nginx
[ec2-user@ip-10-123-3-106 ~]$ sudo yum install -y httpd
Loaded plugins: extras_suggestions, langpacks, priorities, update-
              : motd
Resolving Dependencies
--> Running transaction check
---> Package httpd.x86_64 0:2.4.54-1.amzn2 will be installed
--> Processing Dependency: httpd-tools = 2.4.54-1.amzn2 for package: httpd-2.4.54-1.amzn2.x86_64
--> Processing Dependency: httpd-filesystem = 2.4.54-1.amzn2 for package: httpd-2.4.54-1.amzn2.x86_64
--> Processing Dependency: system-logos-httpd for package: httpd-2.4.54-1.amzn2.x86_64
--> Processing Dependency: mod_http2 for package: httpd-2.4.54-1.amzn2.x86_64
--> Processing Dependency: httpd-filesystem for package: httpd-2.4.54-1.amzn2.x86_64
--> Processing Dependency: /etc/mime.types for package: httpd-2.4.54-1.amzn2.x86_64
--> Processing Dependency: libaprutil-1.so.0()(64bit) for package: httpd-2.4.54-1.amzn2.x86_64
--> Processing Dependency: libapr-1.so.0()(64bit) for package: httpd-2.4.54-1.amzn2.x86_64
httpd 인스턴스에도 설치하고
[ec2-user@ip-10-123-3-106 ~]$ sudo systemctl restart httpd
[ec2-user@ip-10-123-3-106 ~]$ curl localhost
<!DOCTYPE html PUBLIC "-//W3C//DTD XHTML 1.1//EN" "<http://www.w3.org/TR/xhtml11/DTD/xhtml11.dtd>">

<html xmlns="<http://www.w3.org/1999/xhtml>" xml:lang="en">
    <head>
        (생략)
    </head>

    <body>
        <h1>Test Page</h1>

        <div class="content">
            <div class="content-middle">
                <p>This page is used to test the proper operation of the Apache HTTP server after it has been installed. If you can read this page, it means that the Apache HTTP server installed at this site is working properly.</p>
            </div>
            <hr />

            <div class="content-columns">
                <div class="content-column-left">
                    <h2>If you are a member of the general public:</h2>

                    <p>The fact that you are seeing this page indicates that the website you just visited is either experiencing problems, or is undergoing routine maintenance.</p>

                    <p>If you would like to let the administrators of this website know that you've seen this page instead of the page you expected, you should send them e-mail. In general, mail sent to the name "webmaster" and directed to the website's domain should reach the appropriate person.</p>

                    <p>For example, if you experienced problems while visiting www.example.com, you should send e-mail to "webmaster@example.com".</p>

                    <hr />
                </div>

                <div class="content-column-right">
                    <h2>If you are the website administrator:</h2>

                    <p>You may now add content to the directory <tt>/var/www/html/</tt>. Note that until you do so, people visiting your website will see this page, and not your content. To prevent this page from ever being used, follow the instructions in the file <tt>/etc/httpd/conf.d/welcome.conf</tt>.</p>

                                        <p>You are free to use the image below on web sites powered by the Apache HTTP Server:</p>

                                        <p align="center"><a href="<http://httpd.apache.org/>"><img src="/icons/apache_pb2.gif" alt="[ Powered by Apache ]"/></a></p>

                </div>
            </div>
        </div>
    </body>
</html>
접속 확인
로드밸런서 생성
이제 두 subnet에 대한 로드밸런서를 설정해줘야한다.
- load balancer types 에 대한 게시글 추가로 작성할 예정
soo-lb 라는 이름의 로드밸런서를 추가한다.
그리고 각 nginx와 Httpd가 있는 soo-subnet01, soo-subnet03에 대한 로드밸런서 설정
보안 그룹은 지정한 vpc와 같게 설정해준다.
그 다음, 서브넷 안에서 바라보고있을 포트를 지정해야한다.
바라보고 있을 대상에 대한 그룹, target group 을 지정해준다.
target group 생성
미리 만들어준 target group이 없으므로 create target group 를 선택해 새 탭에서 만들어 오자.
앞서 생성한 인스턴스(nginx, httpd)로 지정해줄 것이다.
nginx, httpd 모두 80번 기본포트를 사용하므로 80으로 지정
지속적으로 health check 할 경로 지정
둘 모두 타겟으로 지정해주고 타겟 그룹 생성
다시 로드밸런서 설정
방금 만들어온 soo-lb-tg 이름의 target group을 지정해준다.
health check
그런데 httpd가 Health checks failed with these codes: [403] 로그와 함께 unhealthy 상태!
이는 index.html을 못찾아서 라고 한다.
밑 블로그 참고해 바라보고있는 경로에 index.html을 직접 설정해주면 된다.
[ec2-user@ip-10-123-3-106 ~]$ sudo cp /usr/share/httpd/noindex/index.html /var/www/html/index.html출처: https://dev.classmethod.jp/articles/mistakes-that-you-make-often-when-you-create-alb/
index.html을 지정해주면
healthy 상태로 바뀐 것 확인
접속
접속은 앞서 만든 load balancer 상세 창에 나와있는 DNS로 하면 된다.
같은 주소에서 httpd, nginx 가 번갈아가며 응답하는 것을 확인할 수 있다.
security group 설정
아웃바운드 규칙은 따로 지정해주지 않았고
httpd, nginx 의 80번 기본 포트, 두 인스턴스에 ssh 접속 할 수 있도록 22번 포트, 그리고 모든 IP에 대해 접속할 수 있도록 설정해주었다.
- 8080과 8085는 따로 tomcat이랑 spring boot 프로젝트 띄우기 위해 설정해둔 것